Low pH can cause serious production problems for growers. Learn steps to determining low pH in growing media, how to properly sample for accurate testing and the best options for raising growing media pH. This valuable knowledge will help growers maintain the right growing media pH for their crops to ensure reliable production results.
Three Steps for Determining Low pH
Know Optimal pH for the Crop
Before deciding whether growing media pH is too low, the grower must determine what constitutes low pH for a given crop. For example, if geraniums (Pelargonium spp.) are the main crop, the desirable pH during production should be in the 5.8 – 6.5 range. Or, if the crop is calibrachoas, petunias, or pansies, the optimal pH during production should be more in the 5.2 – 5.8 range. Growing media with low pH is generally an issue for plants that are sensitive to excess minor nutrients, which are more available at lower pH ranges.
Know Growing Media pH
Once the desired pH range for a crop is determined, growers must look at the pH of their growing media. Media pH values can vary widely due to a number of factors. The main factors influencing growing media pH are age, ingredients, moisture levels, and storage temperatures. The grower must have a general idea of what the growing media pH will be during production. Media may have an out-of-the-bag pH that is lower than the desired optimal range, but once in production, it should rise within the desired range in 7 to 14 days, assuming water quality and fertilizer selection have been taken into account.
Know Irrigation Water and Fertilizer pH
Water quality and fertilizer also impact media pH. The pH of irrigation water can vary widely. Highly alkaline water leads to a pH increase. Fertilizer ingredients also impact pH. High nitrate and calcium fertilizers are more alkaline and tend to increase pH over time. High ammonium fertilizers are more acidic and will immediately cause a decrease in pH, followed by additional pH lowering over time.
Testing for Low pH
So how can one determine if the pH is too low? The grower can run tests over time on the unused mix to determine if the pH rises after initial wetting. Generally, growing media that has been wetted down with irrigation water will show a pH increase of 0.3 to 0.5 or more after 24 to 48 hours. If testing shows this expected pH increase, the media should eventually get to the desired range. Media pH can continue to rise slowly over the next 7 to 14 days, but generally if we see the expected increase after 24 – 48 hours it is safe to assume that media pH will be adequate for crop production. If out-of-the-bag growing media pH is in the 5.4-6.0 range, it should be adequate without further testing.
Sampling Methods for Testing
Collecting proper samples is essential in helping growers determine the pH of growing media. Packaging formats determine the sampling method. For small formats, such as 2.8 cubic foot bags or 3.8 cubic foot bales, the best samples should represent a composite from a few unused bags or bales. For a small-format composite sample, gather equal samples from 2 or 3 bags, being sure to collect from the middle of the bag or bale, and then combine them. For large formats, such as 55 cubic foot bales or 110 or 120 cubic foot towers, collect composite samples of equal size from a few areas of the bales or towers.
Growing media samples may also be taken from pots during production. To test used mix in production, take equal samples from the middle of numerous pots to create a composite sample for testing. Avoid sampling from the very top or bottom of the pots.
Different volumes of media should be taken, depending on whether you are testing once or over a period of time. For one-time testing, a quart-sized composite sample is adequate. For testing over time, a gallon-sized composite sample is better.
Label samples to maintain correct testing information and match testing results. Labels should contain the following information: date, type of mix, production code from bag or bale labels, and any special notes regarding the mix. Take notes! All of the information on the label should tie back to the total information of the sample.
If samples are to be sent to a lab, send them overnight or via 2-day air to make sure you get results in a reasonable amount of time. Sample at the beginning of the week to avoid having samples sit over a weekend.
Growing Media pH Testing Methods
There are two main options for testing media pH: on-site testing or lab testing. On-site testing provides immediate results and allows the grower to control the testing process. Lab testing reduces labor input and provides a more complete analysis, including data on all major nutrients. Both methods are recommended. Test on-site, but also send some samples to a lab to support on-site results and to get a more complete analysis of the growing medium.
When testing on-site, a simple and repeatable testing method is achieved by creating a 2:1 dilution. This means adding 2 parts distilled or deionized water to 1 part growing medium. It is easier than the saturated media extract method, as it eliminates the subjective determination of when a mix is “saturated”. After mixing the samples, allow them to sit for 15-20 minutes at room temperature, then test the pH and electrical conductivity (EC) if you have an EC meter. Stay consistent in the time you allow the sample to sit.
Continue to test the pH of your growing media. Test media before using it in production, and test it again 7 -10 days after initial watering. Then continue to test on a weekly or bi-weekly basis during crop production. Track your results and review them from year to year. Retest immediately if your results change dramatically to make sure you are not experiencing a test error.
Options for Raising Growing Media pH
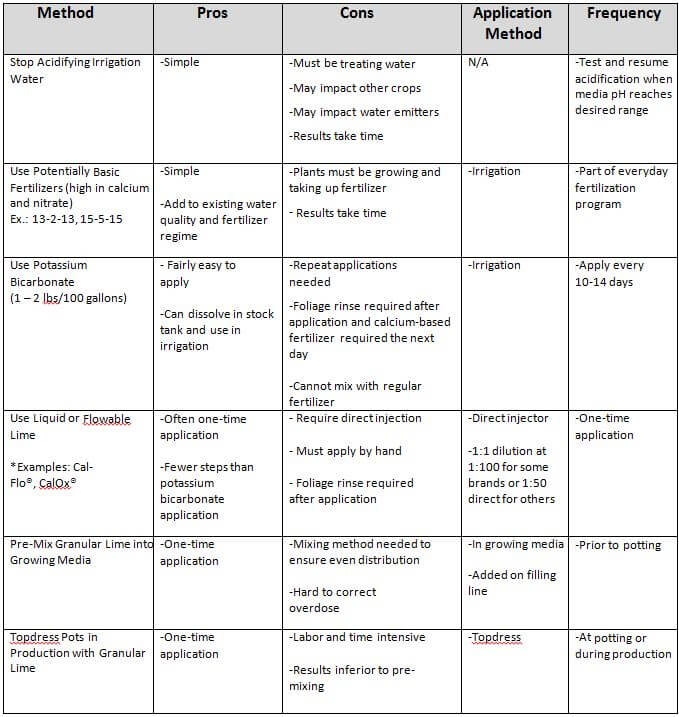
Table 1. Options for raising growing media pH.
There are a number of options when dealing with low pH in growing media. (The different possibilities are listed in Table 1, along with the pros and cons of each method.) The decision on which method (or methods) to use will depend on available labor, greenhouse conditions, and grower preference.
The two easiest options are to stop acidifying water or use potentially basic fertilizers, but they may not provide a quick enough pH change, especially for crops requiring high pH. The use of potentially basic fertilizers should be part of any of the other choices offered in the table.
If a low pH issue is observed prior to potting, lime can be added to the growing media on the filling line, if possible. This will have the best overall impact. Test various rates, but incorporating 2-3 pounds of lime into one cubic yard of mix should bring the mix pH up about 0.5-0.75, depending on the type and coarseness of the lime. Calcitic lime will increase the pH faster, but it will not last as long as dolomitic lime. Topdressing with lime is another possibility, if the growing media is already in the pots or the crop is already in production, though the impact on pH may not be as great.
The addition of potassium bicarbonate when the mix is already in production is relatively easy, but it offers only a temporary solution. It may be a good choice if a grower feels that the fertilizer regimen will eventually bring the pH up, but they need a short-term quick fix. Otherwise, the addition of potassium bicarbonate will need to be repeated every 10-14 days to keep the pH up. Rate for potassium bicarbonate is 1 to 2 pounds per 100 gallons of final solution (1 to 2 pounds per gallon for a 1:100 injector). Some growers have reported issues with potassium bicarbonate in the stock tank when water pH is above 7. Do not combine potassium bicarbonate in the same stock tank with the regular fertilizer!
The final option would be to use a flowable or liquid lime addition. This can be done when the crop is already in production. Examples of flowable lime are CalOx® and Cal-Flo®. They are generally direct-injected from the container at a ratio of 1:100. This should provide around a 0.5 pH unit increase. CalOx® can be injected at 1:5 ratio, providing a greater pH increase. If a higher pH increase is preferred, multiple applications can be made 7-10 days apart, or the product can be diluted in a large tank and applied with a water pump. These products can cause issues with emitters, so they are commonly applied by hand with a hose and regular breaker.
Sun Gro Media Testing:
Sun Gro’s grower technical specialists exist nationwide. Find your state’s Sun Gro contact by visiting http://www.sungro.com/tools-services/grower-technical-services/. To read a full list of our testing options and sampling methods visithttp://www.sungro.com/tools-services/analytic-testing/.


